About

Private information disclosed. Here for example use now... if anyone uses it.

Social Realism - What Is It?

Social Realism is a genre used in visual arts that has, over the years, become a very interesting source of entertainment for all sorts of audience and people; an expressive way of showing a 'slice of life'. Click here to find out more and see various examples of the genre 'social realism' in use...

Film Promotional Poster

For the latter parts of the project, one of the additional tasks me had to complete included creating a film poster to promote our short film...

Research Into Setting

Go to Blogger edit html and find these sentences.Now replace these sentences with your own descriptions.

Creating A Production Company Logo

For this group project, we felt we needed an identity or logo to represent our 'short film company'. We had already had a production meeting organizing and deciding on a name (Makley Productions) but we also felt a visual presentation of this identity would have been appropriate to include as a credit in our final piece.

First Set of Footage!

Our first pieces of our short film to capture on film were the internal shots in the house. Click here to see the very first bits of footage we captured with our Canon 55oD camera and external microphone.

Monday 31 December 2012

Post-Production: Sound Effects & Extra Ambiance

Throughout our project, particularly when it comes to post-production/editing stages, we will almost definitely come across at least one piece of footage where the sound we captured may not be clear enough or perhaps has someone producing undesirable sounds such as talking in the background or maybe even mic faults that create pops or peaks. If we notice any unusable audio like this, we will have to fix the sound by replacing it.
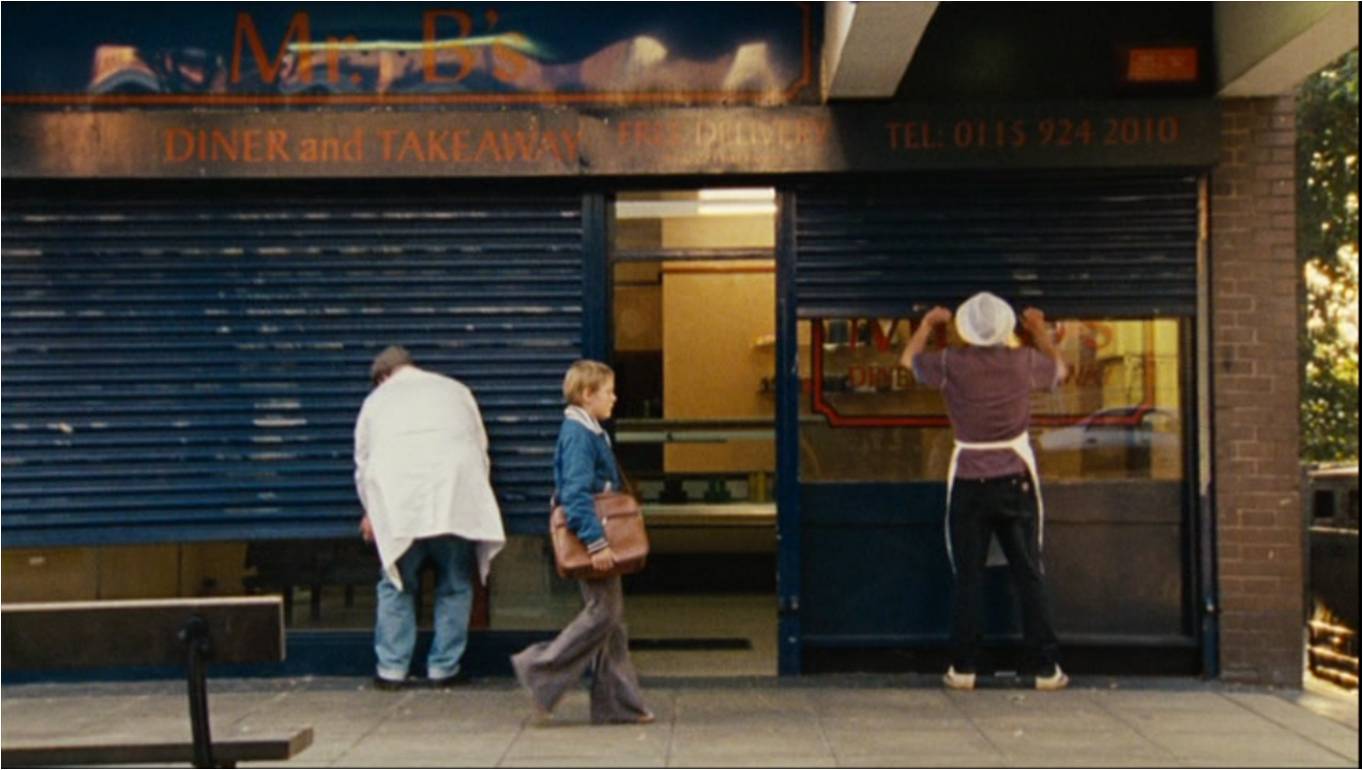
This may involve replacing ambiance or even dubbing over speech if we needed to do so (for example, the very beginning scene where parents are arguing would definitely have to be placed over the footage in post-production stages).

I created some pieces of ambiance myself using my smart phone and uploaded them to Soundcloud, a website that allows you to upload and share audio you have created. You can listen to my audio below.


These audio files of ambiance were then applied to our bus sequence. This was used to mute any announcement sounds we could hear in the original clip (e.g. "151 to Worcester Park") and made the bus's motion a lot clearer to hear.

We then applied our chosen music audio piece, Runaway, to the clip during the sequence just after when Jack (our protagonist) places his headphones into his ears. The audio had two different varieties of sound effect applied to it in the clip. It started off at the chorus with a tinny, headphone-like sound to create a realistic sound for the audio; what you would hear either through your headphones if you were listening to it yourself or what you could hear if you heard someone else's headphones playing music out loud.
A smooth, fade transition to a clear, raw edition of the song that played the last line of the chorus; the one stating he is a runaway. This was used for two reasons; one to state the fact that he has now become and feels like a runaway. The second reason was purely for dramatic effect. The clear sound is what Jack would have heard through his own headphones so by putting what he can hear in the clip for the audience, it might help them sympathies and feel for our character.
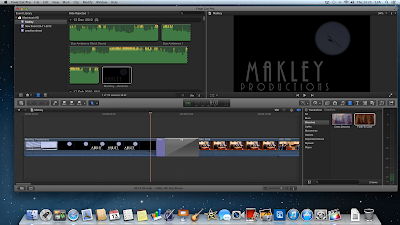
What the work space looked like for this sequence
Argument Scene
Using a smart phone's voice recording app, we recorded our argument scene, loosely following the script we had previously written.

We took two takes of this scene and uploaded them to Soundcloud again. You can hear the two, raw and unedited, takes below (warning: contains strong language);


Thursday 20 December 2012

Post-Production: Importing Our Logo

Importing our company logo sequence into the beginning of our short film was very easy; with a simple click and drag maneuver, we placed it at the very start of our project using Final Cut Pro on a Mac.

We also applied a slowly transitioned fade to and from black transition between the logo sequence and opening clip to provide a smooth transition into our film rather than creating imagery that abruptly interrupts the logo or film footage. It also helps ease the viewer into watching the film rather than using an amateur shock tactic.

Wednesday 12 December 2012

Post-Production: Music Choice for Scene 3 & Argument Opening

During post-production, we had to create two extra pieces of audio to apply and place in to our film. The first was to choice a song for the bus scene of our film and create a headphone effect to this MP3 file.
I decided to create a tutorial on how to do so, along with a compilation of songs that we had considered for our short film product. To create this video, I used screen capture software Hypercam and Sony Vegas Pro 12 to compile and edit the clips. The narration was recorded using Audacity.


In the end, we chose the song Runaway by the Red Hot Chilli Peppers. We felt it, particularly the chorus, expressed similar feelings to what our films character would be feeling and had a much more mellow tone to it than the other song options we had; which were all too heavy or dramatic for our opinion of a social realism based film.

We then contacted the company that the Red Hot Chilli Peppers was contracted to, Warner Brothers Records/Warner Music Group, asking permission to use the piece of music they produced. We had to make sure we mentioned how it was a non-profit student film and how the audio will purely be used for educational purposes.


The next step was to record the argument sequence using two different pieces of equipment; an external camera microphone and a smart phone microphone. This was to see if one gave a better quality than the other or provided any clearer lines.


Lightly following the script we had written, we got two people to act as the parents and record their angry toned conversation. We were not interested in recording any visuals for this scene, as the parents are never on screen, but rather in the background as diegetic background sound.
We did however have an issue with noise in the background, as there were builders on the roof working above us. We picked up noise of their footsteps. This could however be disguised as the parents anger outbursts and footsteps from room to room in the house.

Tuesday 11 December 2012

Production: Rule of Third

Rule of thirds is another aspect I had previously learnt from my own personal video recording activities that can play a significant one for producing nice quality clips.

The rule of thirds system is splitting the visuals into 9 equal squares in a grid shape. I drew a diagram below to explain.


The visuals would have this overlays over it during filming. These lines are used to help give shots tension. The idea is that if the subject on screen meets with/almost lines up with and follows one or two of the lines, it is in a good spot that can provide lots of tension and generally look nicer to present. I told my group members about this and we tried to stick as much to it as we could. Here are some examples of shots that used the grid system.


Monday 10 December 2012

Production: Final Set of Footage (External Shots: Scene 6-7)

By the time December came around, we had to hurry up with filming and get our last shots done before our chosen environments began changing due to seasonal changes. By the time we had gotten to filming, people had already began hanging Christmas lights up, so we had to make sure we hid this time elapse as much as we possibly could. However, it could be argued that you can't see any of these lights in the day time due to them not being on anyway.

We also had to work with darkness as best as we could, as we couldn't use artificial lighting in the external environments we were in due to safety, security and simply non-access to electricity sources. We tried to keep in lit areas and make sure to keep our camera as still as possible to avoid too much blurred movement. We did however mange to create really nice, clear panning movements in some of our shots. 


I complied some screenshots of the footage we filmed on our final shoot and created a .gif image with that that follows a basic fade cycle loop.


Overall, we captured 38:30:09 minutes of footage from all of our shoots. We all agreed that our footage was all just how we wanted it and that we could now begin to edit it all together, into a 5 minute long short film, in our next stage; post-production!

We also got hold of some legally binding release forms for the actors to sign. These would give 'Makley Productions' legal rights to use the actors in any footage, giving consent.


Saturday 8 December 2012

Production: Textures

During our shoots, I decided to take some photos of textures that could be used during post-production or even extra tasks such as posters.
Textures are used to give an image or film a little more depth and adds additional atmosphere to it.

Here are some examples of textures I found on the internet;
We took some of our own textures on set though rather than using external sources such as Imagr or Flickr. Luckily, Matt and I have had to use and experiment with textures in our other A level topic, Graphic Design, so we already have a good knowledge on what they should look like and how they can be used.
I then created a compilation presentation and uploaded it to AuthorStream.


Thursday 6 December 2012

Production: Third Set of Footage (External Shots: Scenes 5-6)

The third day of filming involved a lot more travelling, as we would be travelling around via train. We had to create internal footage of the train stations and train, then also external footage of the travels and any other footage that we would need involving the train stations. We had to act fact on these shots because we need the time to look just before evening, so we had to make sure we filmed everything we needed before it got TOO dark. We did however let some of the later filmed clips run into night time as we would then be creating more clips another night of our actor returning home at this time.

 I imported the photos that were taken during our filming session into Photoshop, then Sony Vegas Pro 12 and created a video clip. For this video, I created a 'film reel' template and placed the photos that were taken on the third day of filming of what we got up to and the different locations we went to. This footage was then uploaded to Vimeo, a video hosting site.

Friday 30 November 2012

Production: Second Set of Footage (External Shots: Scenes 2-4)

Our second day of filming was where we would have to start filming external shots; some easy, some complicated. Because we couldn't get all of our footage shot in one day, we aimed to film at least scenes 2 to 4, thus giving us at least half the footage we would need for our final piece.

We stayed in one area location (between Carshalton and Sutton) to get this days shots. Any other shots that we need for our film would require travelling around via train, which would be rather expensive to do for two days when we could just film everything in 1 day.

This days shoot included bus footage, of which was quite difficult to produce at good quality. We had to take multiple shots and attempts during these travelling scenes, with production members constantly getting on and off of buses in order to create the shots we needed.
For example, if we wanted a scene of our actor getting on the bus, beeping his Oyster card, walking towards his seat and sitting down, we could not just film this it in one take. This is because there would be no angle variety, no shots of the expression on our actors face and there would also be a larger possibility of either being told to stop filming (regardless to the fact if we had permission or not) or members of the public on the bus watching the camera holder following our actor. It would also be very jumpy and not contain any of the shots that we desired or planned.

However, regardless to the difficulty and large effort we had to put into this shoot, one of the positive points of our second shoots was the weather. We were lucky enough to have weather that was exactly what we wanted for our film; dry, light and overcast. This weather made all of our shots look exactly how we wanted them; clear, cold yet 'normal'. We didn't want anything too dramatic (such as a storm or snow) but then we also didn't want something that was massively positive or optimistic (such as sunshine or rainbows).

Throughout the shoot, we only really had tiny problems. One of the main problems was if ever a member of the public looked into the camera during filming. We only noticed these wandering eyes during our overview of the clips, however we will try our best and find a way to cut out any noticeable 'curious' people during post-production.

Overall, the shoot was very well done. We got all the footage we aimed for shot, rarely had any troubles or conflicts with our filming, and overall produced some very nice, high quality clips that will definitely look good in our final product.

Wednesday 28 November 2012

Production: First Set of Footage (Internal Shots: Scene 1)

The only equipment we used for this recording session was a Cannon 550D EOS camera and and on-board external microphone. We decided not to use any additional lighting as the scene already had enough lighting to work with (and could be manipulated at a later date if we desired too) and it may have made the scene seem a little too vibrant and unrealistic.

We also couldn't use a tripod due to a missing plate that would hold the camera in place. We could have called it a day and not recorded anything, but we wanted to stick to plan. So, we improvised and used other surfaces and methods of holding the camera. For example, for the mid-low angle shot, we balanced the camera on an incense burner and placed it on the small coffee table in the middle of the room.
Although this improvisation was an extremely risky method to use, the results
 we came up with were great! There was only the smallest amount of shaking for hand held shots and all the angles and shots looked like they could have been created using a tripod anyway.

Here is a montage video that shows and labels the different angles and shots we took during the first part of production. I placed annotations on the YouTube video for notes on the shots we took.


Below are some photos that Matt and I had taken of our first scenes' set and shoot. These were taken to show the conditions in which we were working in, before and after the tripod malfunction, as well as key shots we felt should be recorded for notable notice.


Tuesday 27 November 2012

Production: First Attempt Issues

We all attended our arrange date to begin film production, however we came across a few issues and did not gain a lot of footage from our session.
Our first issue involved the camera being faulty. It repeatedly told us that our SD memory card was full, regardless to the fact there was not one piece of content on it. Our second problem involved the tripod; it's plate that holds the camera in place began to jam and wouldn't open or close properly, which was then followed by the problem of the panning lever being too stiff for any smooth or faster movement.

However, here are a couple of pictures that show us trying to work with this problem.

We later agreed to replace and fix the equipment at school on the next Monday and rearranged our filming sessions; 27th November would be used for internal shots and the 29th November would be our external shots recording session.

Wednesday 21 November 2012

Production Meeting: Plan Of Action

On the 22nd November 2012, we made a plan to meet and begin filming our projects external shots for the 25th November. We chose to do the external shots first because we felt they would have required a lot more effort and had a lot more that could go wrong with them, so we had to make sure we took a lot of time to produce the shots to how we wanted them.
We agreed to all meet at 11:30 at Strawberry Lodge, which was only a short distance away from Matt's House; the location where we would be beginning our external shots from.


Tuesday 20 November 2012

Planning: Script For Opening Arguement Scene

In the opening scene, when our actor is sitting on his sofa looking frustrated, there will be an argument happening in the background between the boy's parents. Although recording the argument using improvisation might be more realistic, it will cause a lot of hesitation and confusion on what things to say. So, with this in mind, we had to create a very brief script for our parent actors to read from and hopefully feel inspired by during our recording session.
Luckily, thanks to post-audio-production programs, we can delete any silence or awkward/unrealistic sounding lines and mix it all tight together in the final file. I will also apply a filter to the piece that will create a muffled, from another room effect.

This is our brief script of which Matt and Katie would lightly follow.

This idea of improvising some of the script was inspired by the techniques that Ken Loach often uses in his films with unscripted scenes. This is to create a realistic atmosphere and responses from the actors.


Pre-Production: Costume & Character

The next stage of pre-production, which would lead to creating our film, was to plan how we wanted our characters to look. We only had one main acting character in our film, thus meaning we didn't have to plan a costume and personality for a whole cast; just one person. Any one else in the film would be purely dressed as they are; in what they would wear in public in the winter months and out and about.

When it came to designing our protagonist, we wanted his personality to consist of the following features:
We felt that these were the appropriate traits for our character in our film. A lot of social realistic films protagonists are often quite aggressive and violent, however we decided to use a different technique and idea to express any aggression in our character by making him quickly frustrated rather than violent. We also figured since he wasn't part of any gang culture etc, he would probably be a bit of a loner and/or be a little akward in real life, especially what with dealing with life at home, making him bottle up his feelings a lot. This also helps the viewer understand why he will not have a massive script, as he likes to keep to himself.

We then began to design and creating a labelled diagram for our protagonists' costume. Matt and I each drew an interpretation of the characters costume whilst Katie helped us with the annotating.


Planning: Script & Storyboarding

One of the most important stages of the planning was to write a script. Katie produced our script for us.


To also aid us with our project, we had to create a storyboard to know exactly how and what we were going to produce. So, following the script that Katie had written for us, Matt and I began to create visual image versions/format of the script. There were around 16 pages and 30+ different shots, I have scanned and placed them all into a PowerPoint presentation to view. We will carry these sheets of paper, along with the script, around with us during our production stage/filming, so we know exactly what shots and compositions to take.
Here is our storyboard that was uploaded onto http://www.SlideShare.net (open in full screen for readable quality):

Research into Environments of the Real World

Before we began our project, we wanted to explore different settings to see which would be appropriate or interesting yet realistic for our project.

One of the ideas that we discussed and had to consider was that in order for our film to be realistic in Britain, it is likely the weather and overall atmosphere would have to be cloudy, dull and almost miserable due to the frequent cold weather we have here. We felt this added a more realistic feel to the film if we used this atmosphere rather than a bright, sunny one.
Another idea we considered  was the fact that the setting and atmosphere could set the entire mood of the piece, so we had to make sure it suited the theme of the film.

Here is a piece of footage and notes I created (using my smart phone camera and Sony Vegas Pro 12 to edit together) on ideas for location and setting:


Since public transport was going to be one of the main aspects and themes of our film, we had to make sure we researched how we were going to go about filming these scenes. One of the factors that we had to consider for when we filmed in a public transport area was getting permission to do so. In the UK, along with many other countries, filming (or photography) on public transport for projects such as films, advertisements and music videos, is forbidden unless you own the correct rights and permits to do so. Permits can be bought online via the services you require (for example; The Underground, Transport for London, Southern Train Services).

However, we still decided to contact a member of staff who works in a public transport based area (in our case, Southern Train Services). This was so we didn't make any unnecessary payments or approaches for our project, as it was only a non-profit student film. When we asked, the member of staff at first told us exactly as any website would; that we need to buy a permit. However, upon further investigation, the man called his manager and we found out we only really needed a piece of evidence of a school permission form as it was only a non-profit student film. So, we gained this permission form and showed it on our next visit to the train station.
Matt also decided to write an email to TFL (Transport For London) to contact them anyway to ask for permission and make sure that what we were doing was legal and okay to do. He contacted them via the email service 'Swan Webmail'.

We gained feedback of the same kind stating we just needed proof of permission from our school, so we made sure to always carry round a permission form during filming.

Monday 19 November 2012

Creating A Production Company Logo

For this group project, we felt we needed an identity or logo to represent our 'short film company'. We had already had a production meeting organizing and deciding on a name (Makley Productions) but we also felt a visual presentation of this identity would have been appropriate to include as a credit in our final piece.
We began looking into different film production companies, such as Paramount and 20th Century Fox, for inspirations from their logos.

I found a video on YouTube that showed some of the company logo’s that we looked at.


After looking at these logos, we started planning our own. We first created our actual logo. We used a sans-serif tall white font. It did however contain a few interesting little details in the font that made it technically half sans-serif, half serif. We wanted to keep the logo simple, and thus we did.


We had some footage that we recorded during one of our 'camera testing' sessions, which was set on our school playground and focused on lots of seagulls in flight. We decided this would be a good piece of stock footage to use for an animated version of our logo, as it could be manipulated to look very professional easily.
I decided to take on the technical side of this process as well as some of the creative side.
During discussion of our design, I created a storyboard so I that I had knew what to work with and from. It stated information such as the times that certain visuals would be visible and what audio would be audible etc, the information given in these storyboards had to be quite concrete to ensure that I followed what the group had discussed and decided on. It also made sure I didn't get side-tracked or put in any other ideas that may have ended up not suiting the logo at all. However, the final product may not be 100% the same as my initial idea plan.


I began by creating a new project and importing the full raw footage into Sony Vegas Pro 12, a video editing program. By importing the raw footage, I had full access to every piece of footage I would or could need. I then cut and split through the video footage and found the clip that I needed for the logo.


The first step I took after this was to choose a frame in which the footage would freeze frame at, which meant I had to look for a clear frame rather than one that was blurred or inaccurate from the storyboards we made. However, I could not find the clear shot I needed that was in the same position as the one we had planned, so I had to improvise and find the nearest clear shot I could. It was on the opposite side of the screen but it still seemed appropriate luckily.


I then created an inverted mask on top of the video layer and created a circle that was set to follow and gradually shrinks on to the seagull. This circle would then freeze at the same time as when the freeze frame was placed.


I then had to take audio into account and apply some extra audio to the footage to make it seem more interesting and clear, as the raw footage's sound was extremely distorted, noisy and would have sounded very unprofessional. I downloaded some copyright-free source sounds from a website called http://soundbible.com. The sounds were simple wind noises which, in reality, could have been done easily by us, however we didn’t feel it necessary considering the easy access we had to the sounds otherwise. It also would have been a lot higher quality from another source.
We could however use the sounds of the seagull cries from our footage, however the cries that were from the particular clip we used had distortion and talking over them, so I had to venture back through the other pieces of footage to find different, clearer cries and move them to the section of visuals we were using.

I also wanted to add some background music to the piece just to add a little more drama and atmosphere to it all. I needed a music piece that was smooth, soothing and calm. I added a piece from the official soundtrack of a game called Clannad called 'Town, Flow of Time, People'. This piece suited the scene very well, it almost sounds like a soothing wind itself so it blended well with all the sound effects.


The next step involved generating text onto a new layer, above the footage,stating our company name; Makley Productions. I chose a sans-serif, tall, white font for the logo as it suited the idea of modern films, whereas a serif font with any other colour or look would have looked dated. The title had a kerning adjustment from the start of the clip to the end, making it move slightly. A fade transition was then applied to all layers; visual and audio to ensure a smooth exit of the clip.

And this is our final logo;

Tuesday 23 October 2012

Production Meeting: Synopsis & Planning

In our second production meeting, we began to produce ideas on what our film was actually going to be about. We began to write possible synopsis ideas using Pages on a Mac.
Te following screenshot shows our first synopsis idea.

Matthew also produced this video to create a visual version of ideas that we had come up with in this synopsis.

Fellow classmates puts comments on to our work and highlighted them with yellow markers so we would know exactly what they were talking about. A lot of the comments didn't seem very useful or even aware of our story's purpose, thus leading us to believe that our synopsis, and overall plot, was not understood and needed some changes.

So from the comments we got and further research/brainstorming, we then produced a second synopsis.
This idea was eventually cut due to how complicated the piece would have been. It was also due to the fact that, regardless to the 'realistic; features the idea possessed, it wasn't very believable and seemed a little too dramatic for a normal persons every day life.


We were finally getting the hang of creating synopsis', which the second one being even better than the first and giving a clearer idea. We did however feel this story that we had created was a little too unrealistic and would be almost impossible to film at a high quality..
So, we finally put in all of our ideal ideas and worked on a final synopsis was the one we decided to use; containing elements of the two previous ideas but with a new plot entirely.

This is our final synopsis and plot idea. This will be what we produce for our final product.

Target Audience:
We then decided to jot down what our preferred target audience for our short film would be;
Although we may not meet these EXACT preferences in the final piece, we will make sure to stick as much as we can to this audience type. We have however noticed that our target audience seems to be quite limited, so if we are to match these targets, we must make sure to make quite specific points throughout our film to match their stereotypical appeals.

Age Rating:


We also decided that our film would have an age 12A certificate on it. This was for a few reasons.
  1. 12 is an age that is often involved with or approaching being involved with a lot of themes that are currently in social realist films of today. This could show the youth that this pathway in the film isn't a good one to take and may provide a role model for them if they ever feel the urge to runaway themselves; showing a way to cope or deal with the situation correctly.
  2. We also chose the age 12 as this is when our youth start to find themselves and become their own person, choosing what will influence their actions and self. Any younger, say for a PG rating, could possibly influence children to runaway from home or act antisocial getting involved in family arguments on purpose due to having be influence by our film. We would NOT want that effect on children, it would cause a very negative response for us as producers and would promote our film as being bad.
  3. We also considered how there isn't any offensive content in the film either though, aside one 'mouthed' profanity which could be misheard or misinterpreted. We did however take measures to make sure this wouldn't be seen as offensive to anyone and boosted the 12A certificate idea. We also would want their parents to be aware of the content they are watching, thus encouraging the fact that a 12A certificate is appropriate.
Gender Preference:
We didn't particularly chose a gender preference or aim for our film, however gender targeting will be present in our film due to the fact we will be using a male actor. It is far more likely that a male will relate to a male character than a female audience. However, we will make sure not to assert the theme of masculinity in our film, as we do wish both genders to be able to watch our film without having to feel they stand for a gender.

Class:
As most social realistic films are about working class people, we wanted the film to be best viewed by this class too, as we felt they would relate to it best. We did however think that middle-class may appreciate the film too, as it may seem dramatic to them. However, overall, working class people will best be suited to our film.

Overall, I quite like our final film synopsis/idea and I think we can definitely match some of the typical conventions and themes that are often approached in social realism films, as well as challenge some of the presentation techniques that are used to get them across the an audience.
It would also be a great idea to reference any information and knowledge we gained from Ken Loach, as he focussed quite a lot of his work on the idea of homelessness; which strongly relates to our film idea of running about and having no where to go (being homeless).


Friday 19 October 2012

Pre-Production: Working With Focus


Focus is something that we wanted to experiment with and use in our short film product. Focus can be used to create a depth of field and point of focus. We all decided to practice the technique. Matt and Katie filmed some footage exploring this camera visual technique and I created a video that includes notes and possible uses for this technique.

Here is the video that shows our learning process on using this filming technique.


We then started thinking about possible interesting ideas we could use in our short film to implicate the focus idea. We knew that focus helps to viewer notice or understand important objects on scene, so we decided to use this idea to think of ways to implicate focus into our short film.

Tuesday 16 October 2012

Research: Camera Angles & Distances

We didn't want to walk into our project completely blind on how to choreograph and set our short film, so we looked back on some research that Katie had created that describes the different uses and advantages of different camera shot styles.

She uploaded this research presentation to SlideShare.

Sunday 14 October 2012

Assembling Equipment

In order to even attempt to film or create any sort of  movie image product, you need to have certain pieces of equipment and a knowledge of how to use them. These range from power sources to suitable lighting to sound equipment and more. I created a basic Powerpoint Presentation to show any equipment that is essential (or optional in some cases) to filming. This was uploaded to Authorstream.


My group also created a step by step video guide to assembling and using some of the major parts of equipment that would be required for a filming project.


Also, I created a diagram that shows how lighting is usually placed and use on a film set. This would be used later on during production for if we ever needed reference as to how to set any artificial lighting on sets.
Lighting Equipment Set-Up Diagram

Project Practice: Creating A Scene

As a class, we were all assigned different roles and were set the challenge of creating a piece of footage that we would all later, in our groups, edit and render to post as a short film scene. Although I was not assigned an official role, I decided to personally focus on and take notes on continuity and how the actors were set out, which would be called choreography on a professional set.

The hardware and equipment we set up and used included; a Canon 550D EOS camera, an external boom microphone, tripod (to support the camera and keep the visuals still) and an SD card that was used to store the footage on.
The shoot went very well overall. The only issue I personally felt the shoot had was the time we consumed in order to create the shots. However, this could be argued by the fact that this was our first filming shoot and we would did not entirely know what we were doing. We had to learn how to create a piece of footage somehow. We shot many takes and camera angle varieties, including master shots, over the shoulder shots and other interesting angles that would usually be used in short films. These would then be cut into a scene using Final Cut Pro on a Mac.

We got into our group and began editing the footage together. We were focussing on the piece being fluid, creative and pleasant to look at, as well as understanding how visuals and audio work together.


This is what we created using the footage we had shot during the class shoot:


By creating this piece of footage, it allowed us all to practise the use of post-production editing software such as Final Cut Pro and also allowed us to become comfortable with using hardware such as cameras and boom microphones.
It also gave us a much better understanding of how to create well cut clips, especially shots that follow into each other. Part of creating a successful film is to make sure the clips we use cut into each other fluidly. I think our best example of a fluid cut is from 0:04 - 0:06, as our actors movement match up really well through these two shots. I also really like how we'd focus on one of the actors face if they were speaking at some points, giving full attention to them. This taught us how we can present ideas and any important 'objects' in our own films shots, knowing how to focus on points of interest.

We did however have a few issues with noise, which can be heard. Although very faint, there are certain points of the film where noise in the background is slightly louder than other clips. This would be due to the production value rather than the post-production alterations. This problem will need to be tackled sufficiently during the production of our short film project.

Thursday 4 October 2012

Production Meeting: Starting Off!

Today in Media Studies (4th October 2012), we began to take action on our projects by choosing our team mates/groups of which we would work with through this project.
I am in a group with Matt Martyn and Katie Jones.

Our first meeting consisted of thinking of a production company name for ourselves and discussing the possible future ideas we could use for our short film of the social realism genre.
I created a presentation on Prezi to present a summary of the meeting we had. Please view in full screen in order to see details in the presentation.

Friday 28 September 2012

Common Features

I then created a diagram that explains the main points and aspects I have gained knowledge of from researching the social realism genre.